03组件三大特性之Props
# 03组件三大特性之Props
# 1.组件
组件,从概念上类似于 JavaScript 函数。它接受任意的入参(即 “props”),并返回用于描述页面展示内容的 React 元素。
# 1.函数组件
定义组件最简单的方式就是编写 JavaScript 函数:
function Welcome(props) {
  return <h1>Hello, {props.name}</h1>;
}
2
3
该函数是一个有效的 React 组件,因为它接收唯一带有数据的 “props”(代表属性)对象与并返回一个 React 元素。这类组件被称为“函数组件”,因为它本质上就是 JavaScript 函数。
# 2.类组件
class Welcome extends React.Component {
  render() {
    return <h1>Hello, {this.props.name}</h1>;
  }
}
2
3
4
5
# 2.Props
# 1.组件的props
当 React 元素为用户自定义组件时,它会将 JSX 所接收的属性(attributes)以及子组件(children)转换为单个对象传递给组件,这个对象被称之为 “props”。
组件无论是使用函数声明还是通过 class 声明 (opens new window),都绝不能修改自身的 props。来看下这个 sum 函数:
function sum(a, b) {
  return a + b;
}
2
3
这样的函数被称为“纯函数” (opens new window),因为该函数不会尝试更改入参,且多次调用下相同的入参始终返回相同的结果。
相反,下面这个函数则不是纯函数,因为它更改了自己的入参:
function withdraw(account, amount) {
  account.total -= amount;
}
2
3
所有 React 组件都必须像纯函数一样保护它们的 props 不被更改。
# 2.组件通讯
# 1.父传子
// 父组件
class Parent extends React.Component {
	  state = { lastName: '陈' }
    render() {
      return (
        <div>
          传递数据给子组件: <Child name={this.state.lastName} />
        </div>
      )
   }
}
2
3
4
5
6
7
8
9
10
11
// 子组件
class Child extends React.Component {
   render() {
   	return (
   		<div>
   			父传给子的数据: {this.props.name}
   		</div>
   	)
   }
}
2
3
4
5
6
7
8
9
10
11
# 2.子传父
// 父组件
class Parent extends React.Component {
  state = {
    parentMsg: ''
  }
  getChildMsg = data => {
    this.setState({
      parentMsg: data
    })
  }
  render() {
    return(
      <div>
        父组件: {this.state.parentMsg}
        <Child getMsg={this.getChildMsg} />
      </div>
    )
  }
}
2
3
4
5
6
7
8
9
10
11
12
13
14
15
16
17
18
19
20
	// 子组件
	class Child extends React.Component {
   	state = {
   		msg: '学前端'
   	}
   	handleClick = () => {
   		this.props.getMsg(this.state.msg)
   	}
   	render() {
   		return (
   			<div>
   					子组件: <button onClick={this.handleClick} />
   			</div>
   		)
   	}
   }
2
3
4
5
6
7
8
9
10
11
12
13
14
15
16
17
# 3.兄弟之间(状态提升)
class Counter extends React.Component {
  state = {
    count: 0
  }
  onIncrement = () => {
    this.setState({
      count: this.state.count + 1
    })
  }
  render() {
    return (
      <div>
        <Child1 count={this.state.count} />
        <Child2 onIncrement={this.onIncrement} />
      </div>
    )
  }
}
2
3
4
5
6
7
8
9
10
11
12
13
14
15
16
17
18
19
// Child1
const Child1 = (props) => {
 	return <h1>计数器: {props.count}</h1>
}
2
3
4
5
const Child2 = (props) => {
 	return <button onClick={() => props.onIncrement()}>+1</button>
}
2
3
# 4.context(上下文)
*React.createContext:*创建一个装上下文的容器(组件),defaultValue可以设置需要共享的默认数据
*Context.Provider:*提供者,用于提供共享数据的地方,value属性设置什么数据就共享什么数据
*Context.Consumer:*消费者,专门消费Provider提供的共享数据,Consumer需要嵌套在Provider下面,才能通过回调的方式拿到共享的数据。只有函数组件会用到。
*Class.contextType:*记住是用于指定contextType等于当前的context,必须指定,才能通过this.context来访问到共享的数据。只有类组件会用到。
*Context.displayName:*context对象接收一个名为displayName的属性,类型为字符串。React DevTools使用该字符串来确定context要显示的内容(暂时还没用到)
const { Provider, Consumer } = React.createContext()
class App extends React.Component {
 render() {
   return (
   // value表示要传递的数据
     <Provider value='pink'>
       <div className='app'>
         <Node />
       </div>
     </Provider>

   )
 }
}
const Node = props => {
 return (
   <div className="node">
     <SubNode />
   </div>
 )
}
const SubNode = props => {
 return (
   <div className='subnode'>
     <Child />
   </div>
 )
}
const Child = props => {
 return <div className='child'>
   <Consumer>
     {
       data => <span>我是子节点 -- {data}</span>
     }
   </Consumer>
 </div>
}
2
3
4
5
6
7
8
9
10
11
12
13
14
15
16
17
18
19
20
21
22
23
24
25
26
27
28
29
30
31
32
33
34
35
36
37
38
# 3.redux
# 1.简介
Redux 是 JavaScript 状态容器,提供可预测化的状态管理。应用中所有的 state 都以一个对象树的形式储存在一个单一的 store 中。 惟一改变 state 的办法是触发 action,一个描述发生什么的对象。 为了描述 action 如何改变 state 树,你需要编写 reducers。
# 2.工作流程
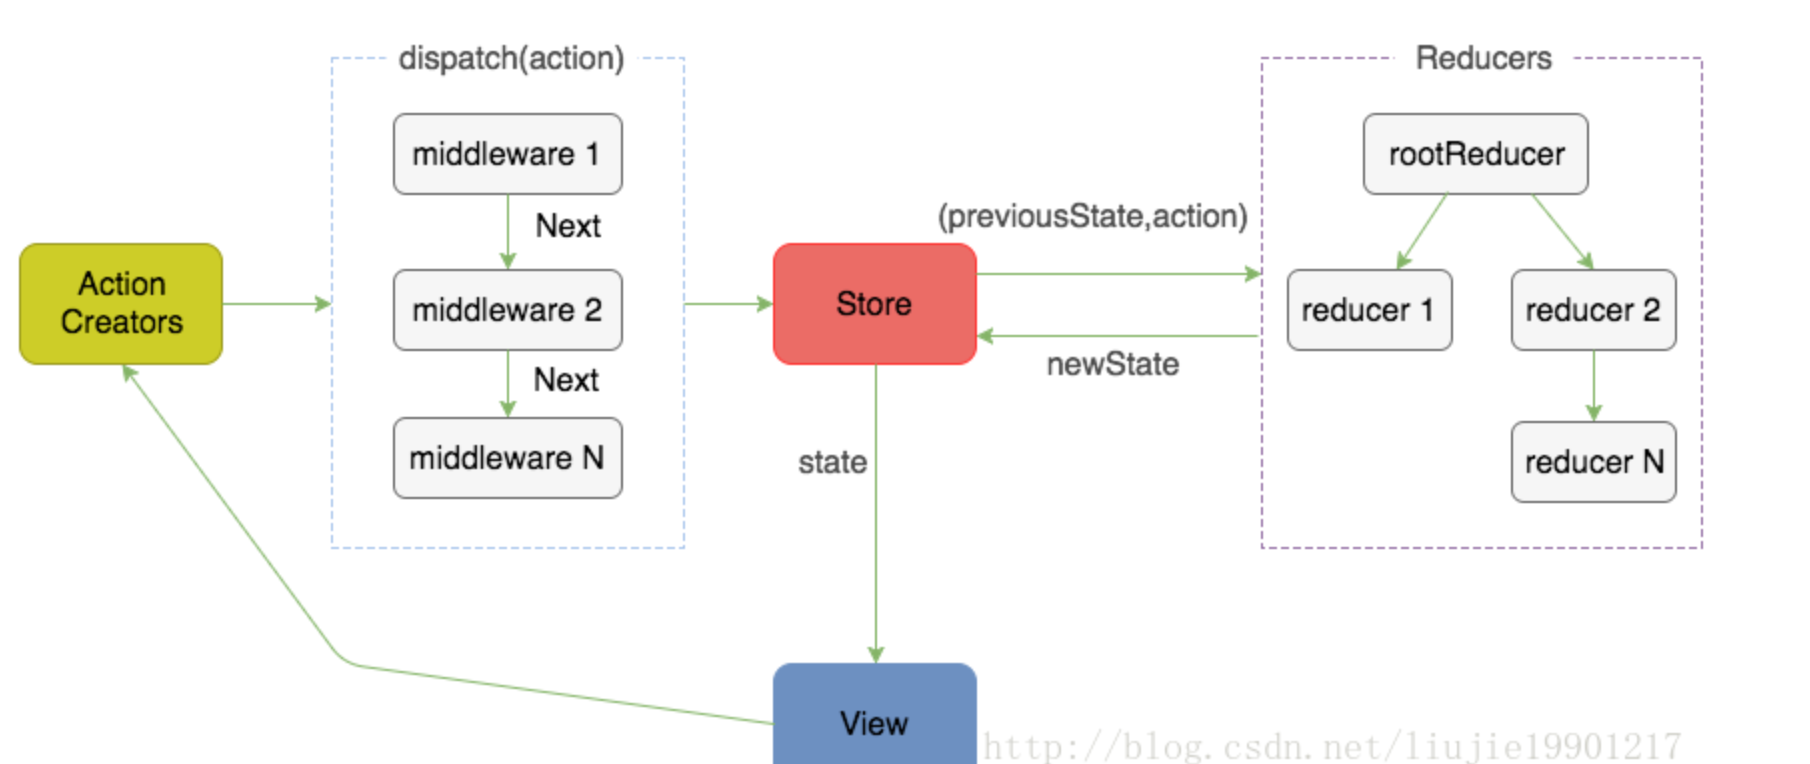
- 首先,用户(通过View)发出Action,发出方式就用到了dispatch方法;
- 然后,Store自动调用Reducer,并且传入两个参数:当前State和收到的Action,Reducer会返回新的State;
- State一旦有变化,Store就会调用监听函数,来更新View。
可以看出,在redux的整个工作流程中数据都是单向流动的,这种方式保证了流程的清晰。
# 3.核心概念
- Store: 保存数据的地方,你可以把它看成一个容器,整个应用只能有一个Store。
- State: Store对象包含所有数据,如果想得到某个时点的数据,就要对Store生成快照,这种时点的数据集合,就叫做State。
- Action: State的变化,会导致View的变化。但是,用户接触不到State,只能接触到View。所以,State的变化必须是View导致的。Action就是View发出的通知,表示State应该要发生变化了。
- Action Creator: View要发送多少种消息,就会有多少种Action。如果都手写,会很麻烦,所以我们定义一个函数来生成Action,这个函数就叫Action Creator。
- Reducer: Store收到Action以后,必须给出一个新的State,这样View才会发生变化。这种State的计算过程就叫做Reducer。Reducer是一个函数,它接受Action和当前State作为参数,返回一个新的State。
- dispatch: 是View发出Action的唯一方法。
# 4.三大基本原则
单一数据源 整个应用的state被存储在一棵Object tree 中,他只有一个单一的store state是只读的 唯一改变state的办法就是触发action,action是一个描述要发生什么的对象 纯函数的形式执行修改 为了描述action如何改变state tree ,你需要编写reducer,每一个reducer都是一个纯函数
# 5.Action
State 的变化,会导致 View 的变化。但是,用户接触不到 State,只能接触到 View。所以,State 的变化必须是 View 导致的。Action 就是 View 发出的通知,表示 State 应该要发生变化了。
Action 是把数据从应用传到 store 的有效载荷。它是 store 数据的唯一来源。一般来说你会通过store.dispatch()将 action 传到 store。
Action的本质是一个普通的javascript对象,用来表示即将改变 state 的意图。我们约定:action 内必须使用一个字符串类型的 type 字段来表示将要执行的动作,表示 Action 的名称。。 多数情况下,type 会被定义成字符串常量。当应用规模越来越大时,建议使用单独的模块或文件来存放 action。 Action是将数据放入 store 的唯一途径。无论是从 UI 事件、网络回调,还是其他诸如 WebSocket 之类的数据源所获得的数据,最终都会被 dispatch 成 action。
const action = {
  type: 'ADD_TODO',
  payload: 'Learn Redux'
};
2
3
4
# 6.Action Creator
Action Creator 就是生成action的方法,view 要发送多种消息,不一定都要手写,定义一个函数来生成action,会方便很多。
const ADD_TODO = '添加 TODO';

function addTodo(text) {
  return {
    type: ADD_TODO,
    text
  }
}

const action = addTodo('Learn Redux');
2
3
4
5
6
7
8
9
10
# 7.reducer
在 Redux 应用中,所有的 state 都被保存在一个单一对象中。建议在写代码前先想一下这个对象的结构。
Store 收到 Action 以后,必须给出一个新的 State,这样 View 才会发生变化。这种 State 的计算过程就叫做 Reducer。
在确定了 state 对象的结构之后,就可以开始开发 reducer。reducer 就是一个纯函数,接收旧的 state 和 action,返回新的 state。
整个应用的初始状态,可以作为 State 的默认值。下面是一个实际的例子。
(previousState, action) => newState
const reducer = function (state, action) {
  // ...
  return new_state;
};
2
3
4
5
const defaultState = 0;
const reducer = (state = defaultState, action) => {
  switch (action.type) {
    case 'ADD':
      return state + action.payload;
    default:
      return state;
  }
};

const state = reducer(1, {
  type: 'ADD',
  payload: 2
});
2
3
4
5
6
7
8
9
10
11
12
13
14
上面代码中,reducer函数收到名为ADD的 Action 以后,就返回一个新的 State,作为加法的计算结果。其他运算的逻辑(比如减法),也可以根据 Action 的不同来实现。
实际应用中,Reducer 函数不用像上面这样手动调用,store.dispatch方法会触发 Reducer 的自动执行。为此,Store 需要知道 Reducer 函数,做法就是在生成 Store 的时候,将 Reducer 传入createStore方法。
import { createStore } from 'redux';
const store = createStore(reducer);
2
上面代码中,createStore接受 Reducer 作为参数,生成一个新的 Store。以后每当store.dispatch发送过来一个新的 Action,就会自动调用 Reducer,得到新的 State。
Reducer描述了 action 如何把 旧的state 转变成新的 state。state 的形式取决于你,可以是基本类型、数组、对象、甚至是 Immutable.js生成的数据结构。惟一的要点是:当 state 变化时需要返回全新的对象,而不是修改传入的参数。 特别注意:需要谨记 reducer 一定要保持纯净。只要传入参数相同,返回计算得到的下一个 state 就一定相同。没有特殊情况、没有副作用,没有 API 请求、没有变量修改,单纯执行计算。
为什么这个函数叫做 Reducer 呢?因为它可以作为数组的reduce方法的参数。请看下面的例子,一系列 Action 对象按照顺序作为一个数组。
const actions = [
  { type: 'ADD', payload: 0 },
  { type: 'ADD', payload: 1 },
  { type: 'ADD', payload: 2 }
];

const total = actions.reduce(reducer, 0); // 3
2
3
4
5
6
7
上面代码中,数组actions表示依次有三个 Action,分别是加0、加1和加2。数组的reduce方法接受 Reducer 函数作为参数,就可以直接得到最终的状态3。
# 8.纯函数
纯函数是函数式编程的概念,必须遵守以下一些约束。
- 不得改写参数
- 不能调用系统 I/O 的API
- 不能调用Date.now()或者Math.random()等不纯的方法,因为每次会得到不一样的结果
我们将以指定 state 的初始状态(initialState)作为开始。Redux 首次执行时,state 为 undefined,此时我们可借机设置并返回应用的初始 state。
import { VisibilityFilters } from './actions';
const initialState = {
  visibilityFilter: VisibilityFilters.SHOW_ALL,
  todos: []
};

function todoApp(state, action) {
  if (typeof state === 'undefined') {
    return initialState;
  }
  // 这里暂不处理任何 action,
  // 仅返回传入的 state。
  return state;
}
2
3
4
5
6
7
8
9
10
11
12
13
14
这里一个技巧是使用 ES6 参数默认值语法 来精简代码。
function todoApp(state = initialState, action) {
  // 这里暂不处理任何 action,
  // 仅返回传入的 state。
  return state;
}
2
3
4
5
现在可以处理 SET_VISIBILITY_FILTER。需要做的只是改变 state 中的 visibilityFilter。
function todoApp(state = initialState, action) {
  switch (action.type) {
    case SET_VISIBILITY_FILTER:
      return Object.assign({}, state, {
        visibilityFilter: action.filter
      })
    default:
      return state
  }
}
2
3
4
5
6
7
8
9
10
不要修改 state
使用 Object.assign() 新建了一个副本。不能这样使用 Object.assign(state, { visibilityFilter: action.filter }),因为它会改变第一个参数的值。你必须把第一个参数设置为空对象。你也可以开启对ES7提案对象展开运算符的支持, 从而使用 { ...state, ...newState }达到相同的目的。
在 default 情况下返回旧的 state
遇到未知的 action 时,一定要返回旧的 state。
# 9.处理多个Action
function todoApp(state = initialState, action) {
  switch (action.type) {
    case SET_VISIBILITY_FILTER:
      return Object.assign({}, state, {
        visibilityFilter: action.filter
      })
    case ADD_TODO:
      return Object.assign({}, state, {
        todos: [
          ...state.todos,
          {
            text: action.text,
            completed: false
          }
        ]
      })
    default:
      return state
  }
}
2
3
4
5
6
7
8
9
10
11
12
13
14
15
16
17
18
19
20
如上,不直接修改 state 中的字段,而是返回新对象。**新的 todos 对象就相当于旧的 todos 在末尾加上新建的 todo。**而这个新的 todo 又是基于 action 中的数据创建的。
最后,TOGGLE_TODO 的实现也很好理解:
case TOGGLE_TODO:
  return Object.assign({}, state, {
    todos: state.todos.map((todo, index) => {
      if (index === action.index) {
        return Object.assign({}, todo, {
          completed: !todo.completed
        })
      }
      return todo
    })
  })
2
3
4
5
6
7
8
9
10
11
我们需要修改数组中指定的数据项而又不希望导致突变, 因此我们的做法是在创建一个新的数组后, 将那些无需修改的项原封不动移入, 接着对需修改的项用新生成的对象替换。
# 10.store
Store 就是保存数据的地方,你可以把它看成一个容器。整个应用只能有一个 Store。 Store 就是把它们联系到一起的对象。Store 有以下职责:
- 维持应用的 state;
- 提供 getState() 方法获取 state;
- 提供 dispatch(action) 方法更新 state;
- 通过 subscribe(listener) 注册监听器,一旦 State 发生变化,就自动执行这个函数;
- 通过 subscribe(listener) 返回的函数注销监听器。
import { createStore } from 'redux';
const store = createStore(reducer);
store.subscribe(listener);
2
3
显然,只要把 View 的更新函数(对于 React 项目,就是组件的render方法或setState方法)放入listen,就会实现 View 的自动渲染。
store.subscribe方法返回一个函数,调用这个函数就可以解除监听。
let unsubscribe = store.subscribe(() =>
  console.log(store.getState())
);

unsubscribe();
2
3
4
5
createStore方法还可以接受第二个参数,表示 State 的最初状态。这通常是服务器给出的。
let store = createStore(todoApp, window.STATE_FROM_SERVER)
上面代码中,window.STATE_FROM_SERVER就是整个应用的状态初始值。注意,如果提供了这个参数,它会覆盖 Reducer 函数的默认初始值。
# 11.store的实现
const createStore = (reducer) => {
  let state;
  let listeners = [];

  const getState = () => state;

  const dispatch = (action) => {
    state = reducer(state, action);
    listeners.forEach(listener => listener());
  };

  const subscribe = (listener) => {
    listeners.push(listener);
    return () => {
      listeners = listeners.filter(l => l !== listener);
    }
  };

  dispatch({});

  return { getState, dispatch, subscribe };
};
2
3
4
5
6
7
8
9
10
11
12
13
14
15
16
17
18
19
20
21
22
# 12.reducer的拆分
Reducer 函数负责生成 State。由于整个应用只有一个 State 对象,包含所有数据,对于大型应用来说,这个 State 必然十分庞大,导致 Reducer 函数也十分庞大。
const chatReducer = (state = defaultState, action = {}) => {
  const { type, payload } = action;
  switch (type) {
    case ADD_CHAT:
      return Object.assign({}, state, {
        chatLog: state.chatLog.concat(payload)
      });
    case CHANGE_STATUS:
      return Object.assign({}, state, {
        statusMessage: payload
      });
    case CHANGE_USERNAME:
      return Object.assign({}, state, {
        userName: payload
      });
    default: return state;
  }
};
2
3
4
5
6
7
8
9
10
11
12
13
14
15
16
17
18
上面代码中,三种 Action 分别改变 State 的三个属性。
ADD_CHAT:chatLog属性
CHANGE_STATUS:statusMessage属性
CHANGE_USERNAME:userName属性
2
3
这三个属性之间没有联系,这提示我们可以把 Reducer 函数拆分。不同的函数负责处理不同属性,最终把它们合并成一个大的 Reducer 即可。
const chatReducer = (state = defaultState, action = {}) => {
  return {
    chatLog: chatLog(state.chatLog, action),
    statusMessage: statusMessage(state.statusMessage, action),
    userName: userName(state.userName, action)
  }
};
2
3
4
5
6
7
8
上面代码中,Reducer 函数被拆成了三个小函数,每一个负责生成对应的属性。
这样一拆,Reducer 就易读易写多了。而且,这种拆分与 React 应用的结构相吻合:一个 React 根组件由很多子组件构成。这就是说,子组件与子 Reducer 完全可以对应。
Redux 提供了一个combineReducers方法,用于 Reducer 的拆分。你只要定义各个子 Reducer 函数,然后用这个方法,将它们合成一个大的 Reducer。
import { combineReducers } from 'redux';

const chatReducer = combineReducers({
  chatLog,
  statusMessage,
  userName
})

export default todoApp;
2
3
4
5
6
7
8
9
上面的代码通过combineReducers方法将三个子 Reducer 合并成一个大的函数。
这种写法有一个前提,就是 State 的属性名必须与子 Reducer 同名。如果不同名,就要采用下面的写法。
const reducer = combineReducers({
  a: doSomethingWithA,
  b: processB,
  c: c
})

// 等同于
function reducer(state = {}, action) {
  return {
    a: doSomethingWithA(state.a, action),
    b: processB(state.b, action),
    c: c(state.c, action)
  }
}
2
3
4
5
6
7
8
9
10
11
12
13
14
总之,combineReducers()做的就是产生一个整体的 Reducer 函数。该函数根据 State 的 key 去执行相应的子 Reducer,并将返回结果合并成一个大的 State 对象。
下面是combineReducer的简单实现。
const combineReducers = reducers => {
  return (state = {}, action) => {
    return Object.keys(reducers).reduce(
      (nextState, key) => {
        nextState[key] = reducers[key](state[key], action);
        return nextState;
      },
      {}
    );
  };
};
2
3
4
5
6
7
8
9
10
11
你可以把所有子 Reducer 放在一个文件里面,然后统一引入。
import { combineReducers } from 'redux'
import * as reducers from './reducers'

const reducer = combineReducers(reducers)
2
3
4
# 13.相关规则
每个传入 combineReducers 的 reducer 都需满足以下规则:
所有未匹配到的 action,必须把它接收到的第一个参数也就是那个 state 原封不动返回。
永远不能返回 undefined。当过早 return 时非常容易犯这个错误,为了避免错误扩散,遇到这种情况时 combineReducers 会抛异常。
如果传入的 state 就是 undefined,一定要返回对应 reducer 的初始 state。根据上一条规则,初始 state 禁止使用 undefined。使用 ES6 的默认参数值语法来设置初始 state 很容易,但你也可以手动检查第一个参数是否为 undefined。 最终,state 对象的结构会是这样的:
{
  reducer1: ...
  reducer2: ...
}
2
3
4
通过为传入对象的 reducer 命名不同来控制 state key 的命名。例如,你可以调用combineReducers({ todos: myTodosReducer, counter: myCounterReducer })将 state 结构变为{ todos, counter }。 应用中不要创建多个 store!相反,使用 combineReducers 来把多个 reducer 创建成一个根 reducer。
在 Redux 中,只有一个 store,但是 combineReducers 让你拥有多个 reducer,同时保持各自负责逻辑块的独立性。
如果 state 是普通对象,永远不要修改它!比如,reducer 里不要使用 Object.assign(state, newData),应该使用 Object.assign({}, state, newData)。这样才不会覆盖旧的 state。也可以使用 Babel 阶段 1 中的 ES7 对象的 spread 操作 特性中的 return { …state, …newData }。